production
Production Stages
- Sewing
- Turning Inside Out
- Stuffing
- Assembly
- Packaging

Sewing
Workplace Preparation
Workplace preparation begins with the seamstress putting on protective clothing — a light protective overall and safety gloves: the first (inner) pair are rubber gloves, and on top — fabric protective gloves when working with reinforcement (image “S-1.1”).

Image «S-1.1»
Then turn on the sewing machine. Check it for proper operation and functionality: verify the number and presence of threads (image “S-1.2”).
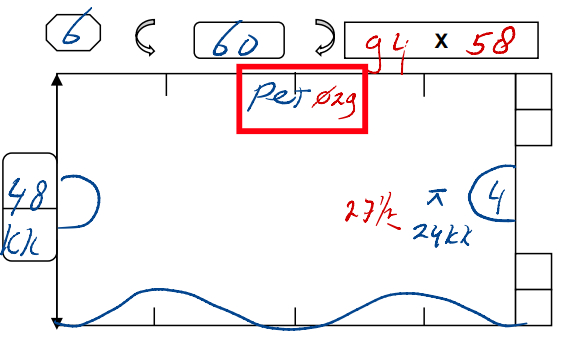
Image «S-1.2»
Once a week, the internal components and the outer casing are blown with air, and machine oil is added into the technical openings (image “S-1.3”).
Image «S-1.3»
Sewing Mattresses
Receiving and Inspection
Stage 1
After receiving the cut materials (blanks) for the upcoming mattresses, a mandatory conformity check is carried out: verifying the mattress blank against the drawings, marking (transferring the number, project abbreviation, special fillings, as well as all special designations such as DD, stitching, buckles, Velcro, flaps) onto the lining side.
The order of processing is also followed according to the installation or delivery schedule.
For example, if there are two orders scheduled for the 10th and 11th of the month, logically the one for the 10th is sewn first.
Presence of Krimps
Stage 2
Presence of krimps and special markings.
If a mattress has krimps, the first step is sewing them on both parts of the same mattress (the front and lining sides).

Special markings, for example, if a mattress consists of two parts A and B, will be written on the blanks as “sewn to A” and “sewn to B,” respectively. There may also be markings such as flap, Velcro M (male) or V (female), labels, buckles, etc. These markings indicate that before sewing the mattress together, these elements must be attached in the specified locations (confirm with the supervisor, as nailed-on buckles may be used).
Then the process moves on to the next stage.
Sewing the Mattress
Stage 3
After sewing the krimps and attaching all necessary components, or sewing the parts into one piece, we place both parts of the mattress together **with the “front” sides facing each other**, aligning the edges evenly. Then we stitch along the contour line, leaving a wide opening (or several openings) for turning the mattress inside out (20–60 cm depending on the mattress size).
Trim the corners and round openings (image “S-2.4”).
We “send” the sewn mattress to the next stage.
Turning Inside Out
Stage 4
We turn the mattress right side out. Carefully check whether the corners are properly turned. Sort the mattresses according to their filling method:
- Machine filling (50 mm, 30 mm);
- Manual (nv, rock wool and others);
Mattresses that will be filled by machine are returned to the seamstresses.
Before Filling
Stage 5
All mattresses are checked for tears or cuts. If needed, they are sent back to the seamstresses for repair.
For mattresses intended for machine filling: sew up the previously left turning opening, leaving a 7 cm opening for machine filling.
Stitch the DD contour or stitching lines.
Then the mattress is sent for filling.
Final Stage
Stage 6
After the mattress has been filled, we sew all the openings to ensure the mattress is sealed.
Instructions for Sewing a Mattress with Increased Thickness
(over 10 cm)
Option 1: Pouf

This option is suitable when special filling is required for mattresses (10 cm and more) and the mattress has no splits or openings.
Inspection of blanks
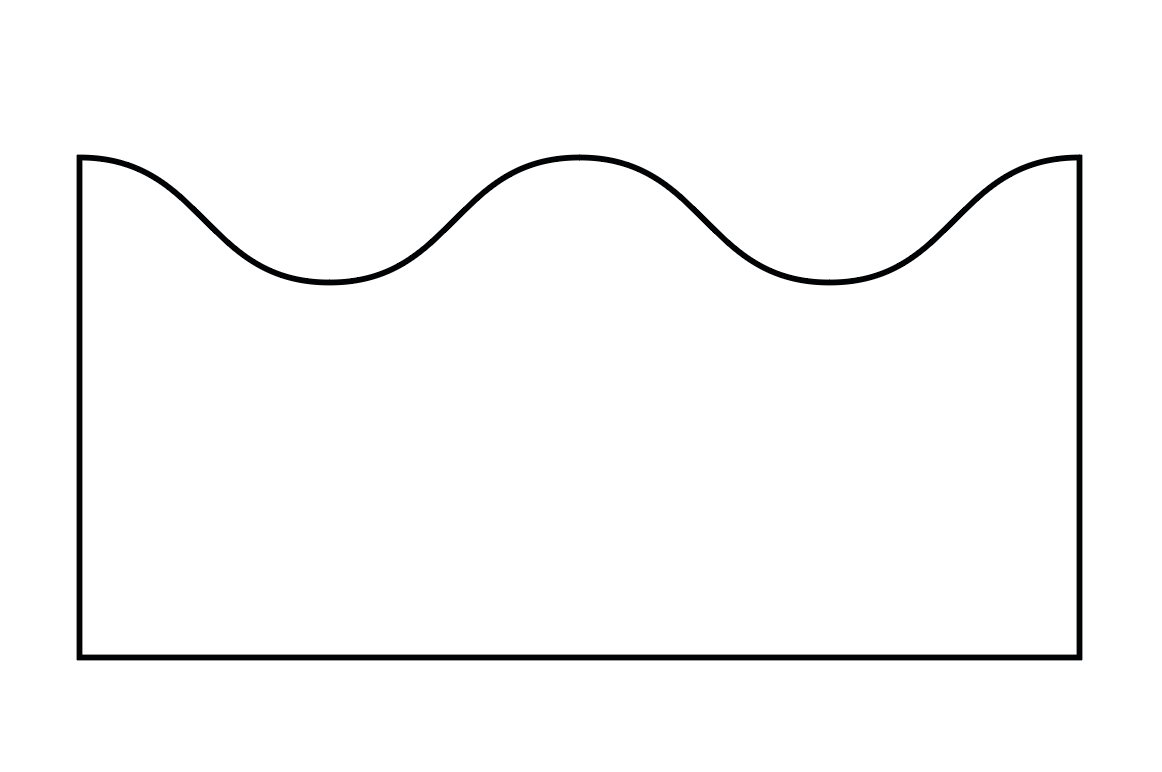
Check the two fabric blanks for the top and bottom parts of the mattress for corner squares: the sides of these squares must equal half the thickness of the filling. For example, for a mattress with a thickness of 15 cm, the squares should be 7.5 cm x 7.5 cm.

Sewing the blanks
Fold the blanks face to face so that the technical lines on the fabric are visible.
Stitch along the perimeter of the mattress, leaving an opening for filling.
Forming the corners (thickness)
Fold the fabric at each corner of the mattress to form a triangle.
Stitch along the lines drawn on the corners of the mattress that correspond to the square dimensions.
Repeat this process for all four corners of the mattress.
Completion
After all the corners are stitched, carefully trim the excess fabric, leaving a small allowance from the seam (1.5–2 cm). Gently turn the blank right side out through the remaining opening. Make sure the corners are well formed. Fill the mattress with the chosen filling through the remaining opening. Ensure the filling is evenly distributed. After filling, carefully sew the opening closed.
Option 2: “Band” Insert
This option is used if the mattress has splits or openings, or if the top material must not come into contact with high-temperature objects.
Preparing the insert (Band)
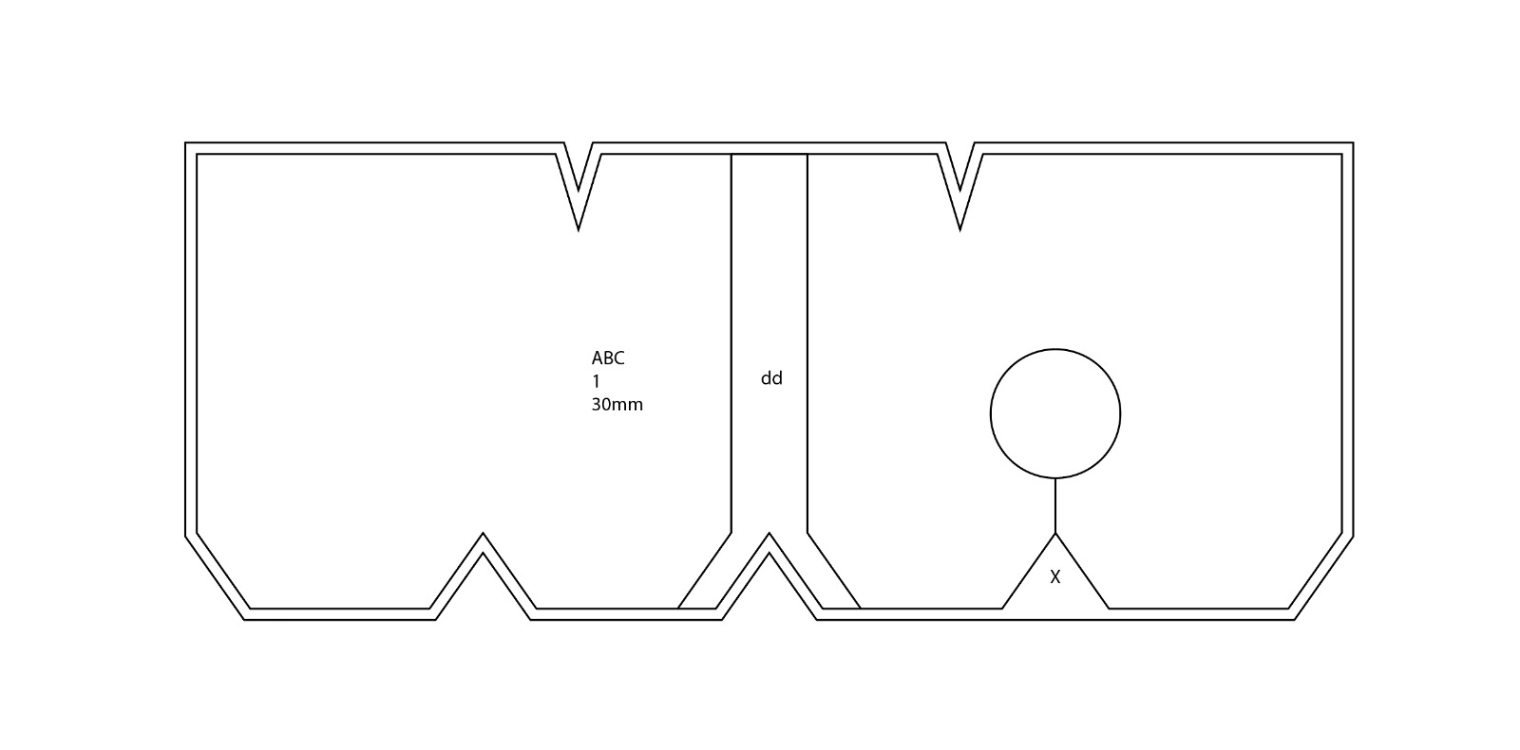
Check the dimensions of the insert. The height must match the required thickness of the mattress (10 cm and more). The length of the insert must correspond to the contour of the blank (including all splits and openings).
Sewing the insert
Sew the insert to the top layer from the wrong side, placing them face to face. Stitch along the entire contour of the mattress, including splits and openings.
Attaching the bottom layer
Then sew the insert to the bottom layer of the mattress in the same way as the top layer, leaving the required technical opening for filling.
Completion
After the blanks are sewn, carefully make technical notches at the openings (circles, squares) in the corners of the splits and other areas. Gently turn the blank right side out through the remaining opening. Make sure all corners are properly turned. Fill the mattress with the chosen filling through the remaining opening. Ensure the filling is evenly distributed. After filling, carefully sew the opening closed.
Envelopes
Envelope sizes

There can be many types of envelopes, but the most common ones are large and small.
Large envelopes have sizes 47 and 44 cm;
Small envelopes have sizes 35 and 34 cm.
Stage 1: Beginning the Work
We sort the two halves of the future envelope into M and V. On both halves we will sew the Velcro along the line that was previously drawn on the material.
The first half will have the M Velcro (male), the second — V (female).
Stage 2: Sew and Turn Inside Out
Place both halves “face to face” and stitch along the edges, except for the **top** part (1 of the 2 short sides of the entire envelope), marking at the same time where the label will be sewn.
Sew the label and turn the envelope right side out, making sure all corners (as well as all edges in general) are properly turned.
Stage 3: Fold Line
Measure 15 cm from the top part of the envelope (the part with the V Velcro).

Stitch along the line — this will form the flap.
Stage 4: Fill with material according to size
Fold the envelope so that the Velcro pieces align, and stitch the sides, thereby closing the envelope (image “S-3.3”).
Close it, inspect it, send it for air cleaning, and pack it into boxes for delivery.

Conducts
Stage 1: Drawing
We unroll the roll of fabric material and make marks according to the drawings, marking the stitching lines and the buckle attachment point (image “S-4.1”).
Cut out the conduct blank, leaving ~2 cm away from the contour of the drawing.

Stage 2: Straps and Buckles
Sew the strap along the contour of the square on the half where the markings were made, first inserting it into the buckle (image “S-4.2”).
Sew the label around the perimeter, above the first strap from the bottom (image “S-4.3”).
Following the same principle, sew the second and third straps with a buckle.
Stage 3: Sewing
Place both halves of the conduct face to face and stitch around the perimeter, leaving one side “open” so the conduct can be filled with material afterward.
Stage 4: Completion
Turn the conduct right side out, then fill it with material (superwol).
Sew the side that was left “open” for filling. Stitch through the middle as well, and the conduct is ready.
Turning Inside Out
Before turning the mattress inside out, make the technical cuts: around circular openings and at the corners of square ones.
Important: Make sure all mattress corners are properly turned. For high-quality turning, it is recommended to use a large needle or knitting needle.
Filling
At this stage, the mattress is filled with the filling material.
The type of filling and its thickness are selected based on measurements taken at the site. The temperature of the pipes or equipment influences the choice of filling.
Common types of filling:
· 50 mm, 30 mm up to 500 degrees.
· 25 mm (NV), 12 mm, 8 mm up to 603 degrees.
· (st.wool) up to 750 degrees.
Other factors also play a role, such as the location (indoors or outdoors), the distance between pipes, equipment, and the wall. If the available space does not allow for the standard 50 mm filling, other values are used, such as 30 mm, 25 mm (NV), etc.
In these cases, it is always necessary to specify the filling values on the drawings and mark them on the backside of the mattress.
Filling Techniques
Fillings are divided into two categories:
Automatic — using specialized equipment.
Manual — performed by hand.
The filling technique is determined as follows:
· Mattresses marked with 30 mm filling and those without marking (default 50 mm) are filled by machine. When filling a mattress made of materials such as silicone–silicone (non-breathable), a special perforated tube is used or filling is done manually.
· All mattresses marked NV (25 mm), 12 mm, 8 mm, st.wool, ultimate, super wool are filled manually with the material corresponding to the marking.
Manual Filling
Machine Filling
Assembly
At this stage, the mattress is equipped with straps (staples), hooks, and buckles. These elements ensure a secure connection and proper functionality of the product.
Assembly with straps (staples).
At this stage, we use the proprietary type of strap — the “carriage strap.”
Types of staples and hooks
Staples and hooks come in two types: GAL and RVS.
Important: In all projects where there is a possibility of rust formation (due to vapors or chemical reactions), as well as in facilities related to food production, stainless steel (RVS) hooks and staples must be used.
Staple assembly process:
- Staples are applied diagonally with equal spacing between them, which ensures not only an aesthetic appearance but also an even distribution of the material inside the mattress.
- Assembly with staples is performed using a specialized machine.

Staple assembly process:
Depending on the size of the mattress, the spacing between the staples may range from 10 cm to 20 cm.
The staples are arranged in a staggered (checkerboard) pattern in the shape of diamonds. The smaller the mattress, the smaller the diamond.
Assembly with hooks
Assembly with hooks is carried out strictly according to the drawings.
Note: If the drawings show a dash at the top or bottom of the mattress, it means that hooks are not required in those areas.
By default, the left and right sides of the mattress are connected to each other, so hooks must be installed in these locations.
Mattresses may also be connected to one another, which is indicated on the drawings as xxxx.

Important Points
Note: If the drawings show a dash at the top or bottom of the mattress, it means that hooks are not needed in those areas.
The lid (PET) must be connected to the corresponding mattress with the same number of hooks on both the lid and the mattress.
Do not forget about the hooks on the cuts (splits).
Distance Between Hooks
Depending on the size of the mattress, the distance between the hooks is 5–10 cm.
The distance from the left/right edge of the mattress must be 8–10 cm, which ensures the ability to tighten the mattress securely on the object being thermally insulated.
For the lid (PET), the distance from the edge of the circle must be 3–5 cm.
Checking the hook attachment
When assembling the mattress with hooks, always check the back side: the hooks must be securely attached to the mattress to prevent them from tearing out.
Packaging
After completing all previous stages, the mattress is packaged for further transportation and storage.
The packaging must protect the product from damage, contamination, and water ingress; for this purpose, durable PVC bags and tightening straps for sealed packaging are used.
The bags are labeled with the project information: name, installation or delivery location, date, and weight (if necessary).